…And we’re back! After a much-needed summer hiatus, it’s that time of the year again when my comrades in the SNL Film Unit all reconvene on the 17th floor of 30 Rockefeller Plaza for another season of filmmaking speed-drills.
While the usual shoot is a dead sprint from Thursday thru Saturday night, every few years we produce a new Title Sequence and that sprint becomes a 3-week non-stop marathon. Especially when it’s the 40th Anniversary season. The passing of Don Pardo — the legendary voice of SNL since 1975 — only amplified the feeling that this new sequence needed to be something extra special.
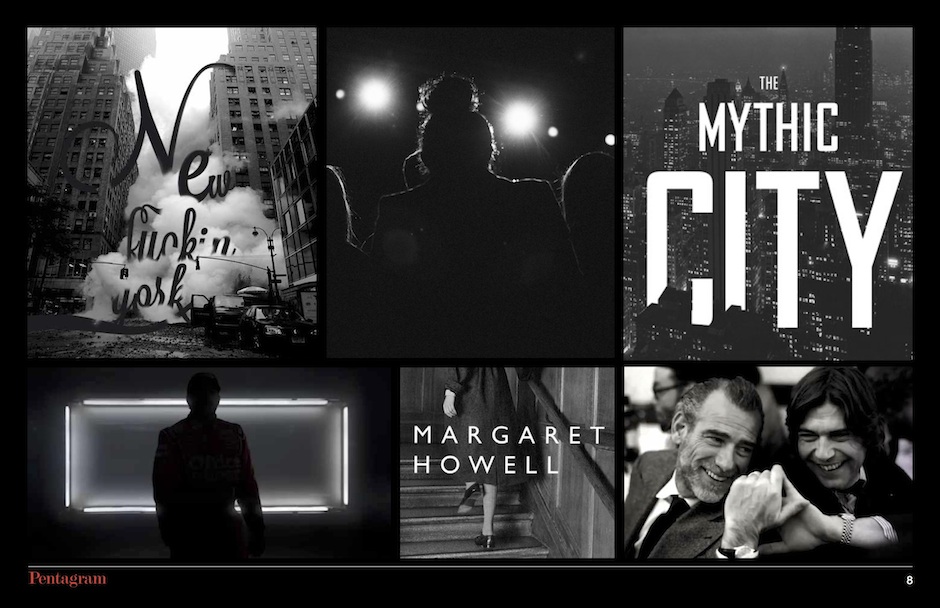
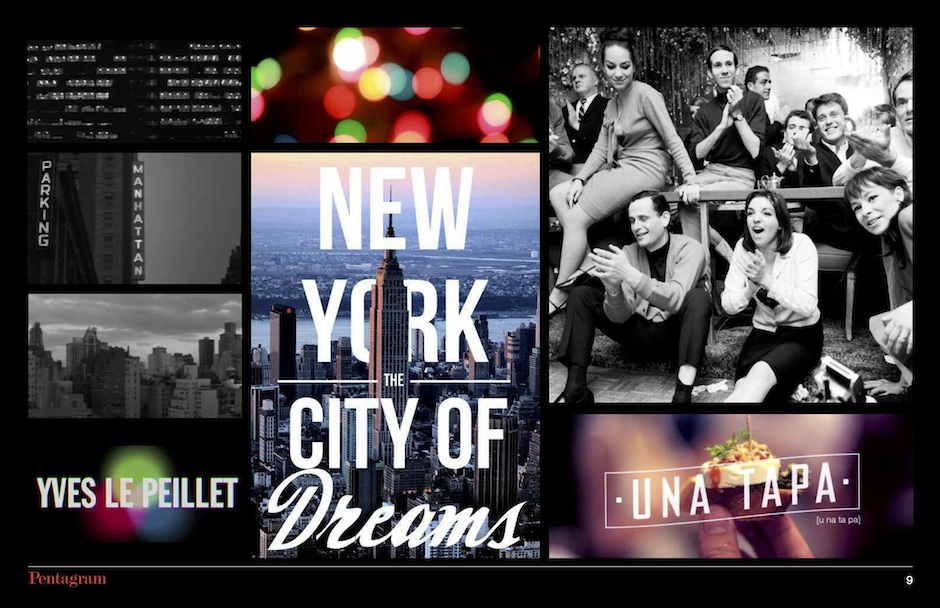
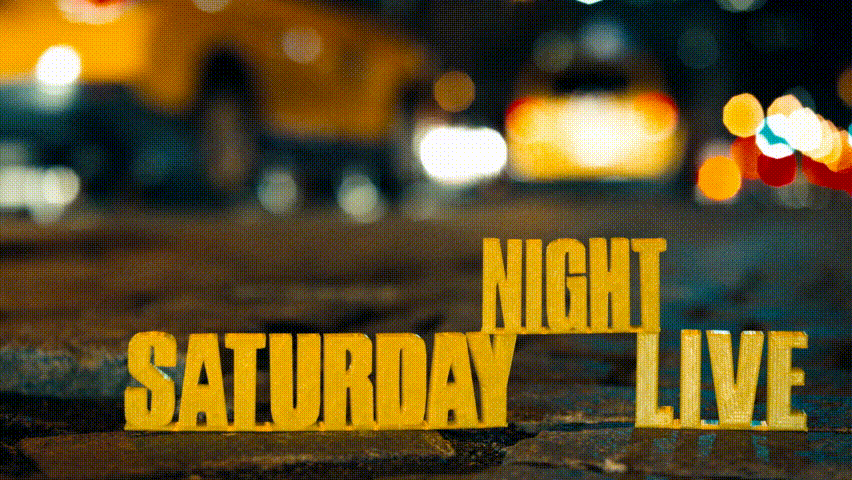
As always, the titles are a huge team effort. Our director, Rhys Thomas, spent the summer collaborating with our logo design team at Pentragram Design, led by Emily Oberman, and with our portrait photographer, Mary Ellen Mathews, on a new logo and font design along with a set of mood-boards to experiment with the overall tone of the sequence. The idea was to honor the 40-year history of the show with something classic and iconic, a little more dressed-up than previous seasons and with typography that was integrated into the cityscape.
Rhys and I started chatting about the title sequence early in the summer as well. It’s a tough challenge to come up with yet another new and interesting way to shoot what is often the exact same night exterior locations. What can we do this year that we haven’t done before? Are there any cool new camera techniques that we can test? What’s the overall approach / concept? Is there a narrative thread or is it pure montage?
We bandied about a lot of different ideas: what about hyperlapse – have you seen the incredible videos by Rob Whitworth? What about super slo-mo – have you seen what the new Phantom4K can do?? For me, the break-through finally came when Rhys mentioned a pretty obscure idea: “There’s this group in Germany doing really cool things with light-writing.” Uh, did you say light-writing?!
Light-writing is just what you’re thinking: a light-source is traced in the air using a long-exposure. It’s a technique that’s as old as photography. In fact, it’s so old-school that when Rhys mentioned it, the first image that came to mind was by Picasso!
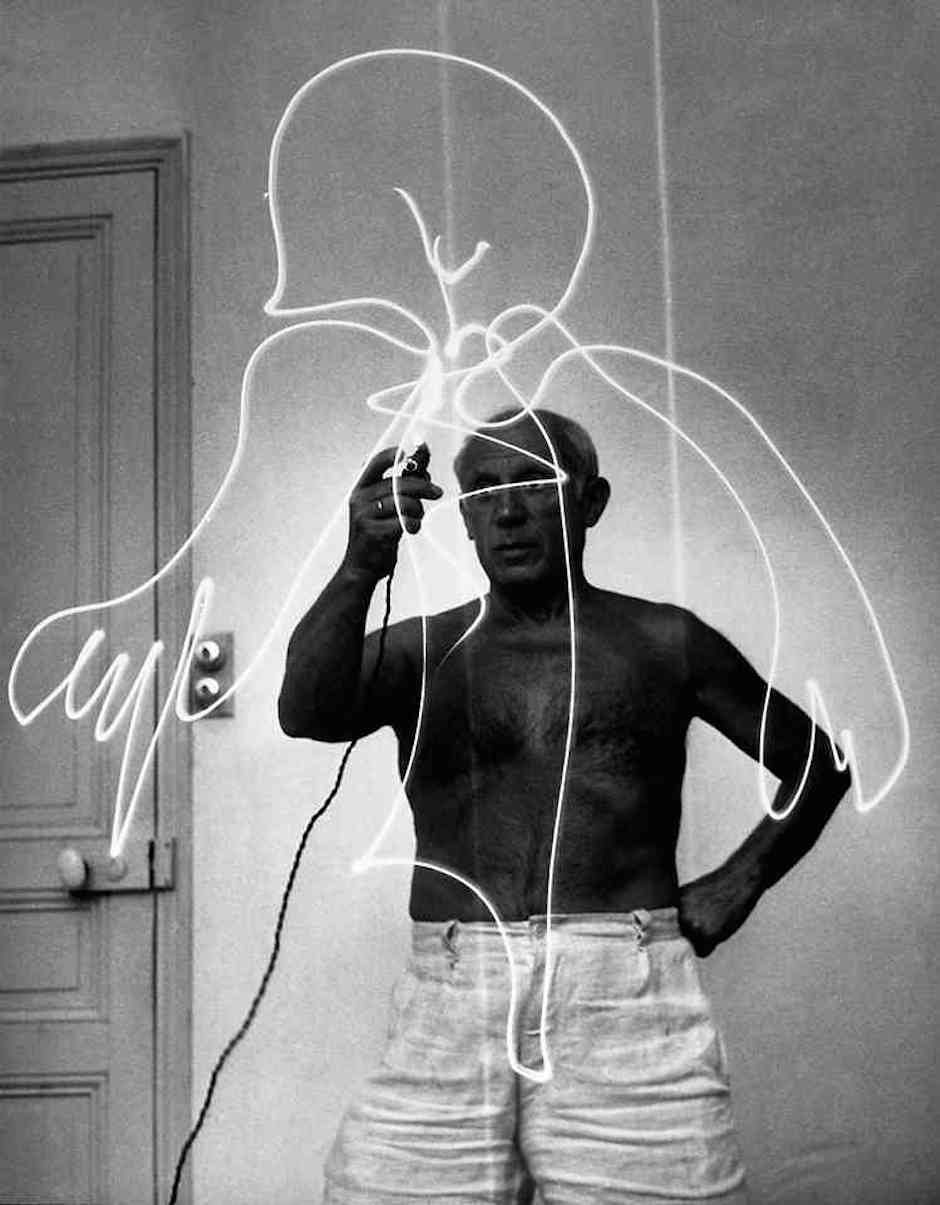
It’s pure in-camera trickery…EUREKA! — suddenly we had our approach. Not just light-writing, but an overall simple, clean concept: as an homage to the 40-year history of SNL, we would approach the sequence using in-camera techniques that would be at home just as well in 1975 as 2014. Nothing that relies on modern post production techniques or other digital trickery (sorry, hyperlapse’ers). It would be low-fi, analog, optical, vintage, classic.
Rhys and I – along with film unit producer Justus McLarty — brainstormed a list of in-camera techniques to test: slo-motion, tilt-shift, black&white, long-exposure motion blur, double-exposures, light-writing, timelapse, strobe photography, aerial photography, infrared photography, optical aberrations, anamorphic distortions, prism-distortions, etc. This was quickly shaping up to be a venture into experimental photography and I admit to being a little nervous about whether the execs at the show were going to think that we had stepped off the deep end. Bear in mind, our job is not to just create a cool montage of New York-y imagery set to music. The most important task is to introduce the audience to our cast members – in this case, all fifteen of them – and serve as an energetic warm-up for the show.
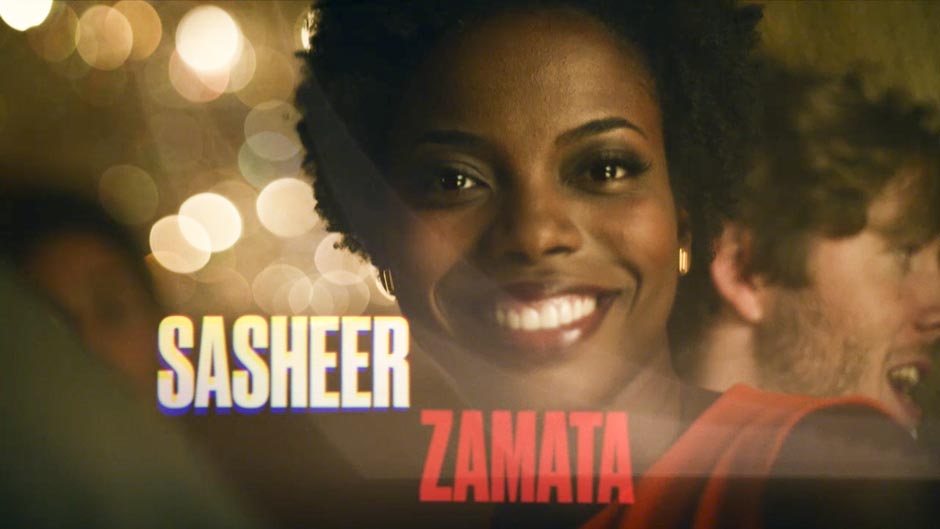
Shooting fifteen different portraits is a tall order and, in years past, the approach has often been to corral the entire cast to one location — a cool bar, a rooftop party scene, a hip nightclub, etc – and shoot everyone out in one long shoot day. Then, in 2009, we took a very different approach, shooting each cast member in a unique night exterior location. This idea happened to coincide with the DSLR-revolution; I shot the entire sequence with a Canon 5DmII, which was the only way we could have captured all of those verite-style, low-light night exteriors at the time. The 2009 sequence lasted three seasons, replaced in 2012 for Season 38 with a new sequence directed by Mary Ellen Matthews that took a studio portrait photography approach. For this 40th Anniversary season, Rhys wanted to return to the energy of shooting each cast member out-and-about in the city, even going to the extent of asking each cast member for location ideas: “Is there a place in the city where you’d like to shoot your portrait?” – offering the cast members creative investment in the title sequence and resulting in a really fun collaboration.
The other element of a new title sequence that we have to deliver are the show’s “bumpers” – the interstitial shots that run between the commercial breaks. So in addition to the fifteen unique cast member locations, we had to come up with a minimum of ten unique bumpers, plus all of the b-roll footage to intercut with the portraits for the montage – all of which must adhere to our new in-camera, lo-fi manifesto. This was getting complicated…
Rhys, Justus and I, along with our coordinators Melanie Bogin and Tom Carley, and office PA / research whiz-kid Louis Leuci, spent about a week brainstorming locations and testing in-camera techniques, including one rather absurd light-writing experiment involving a whisk stuffed with steel wool, doused in lighter fluid and set ablaze (that idea is still in development). We quickly figured out that while some techniques were super cool, if we shot the cast members that way, this would quickly look more like a post-modern video installation than an SNL title sequence, so we limited our portraiture to only the most flattering techniques and relegated the more experimental ideas to either b-roll or bumpers.
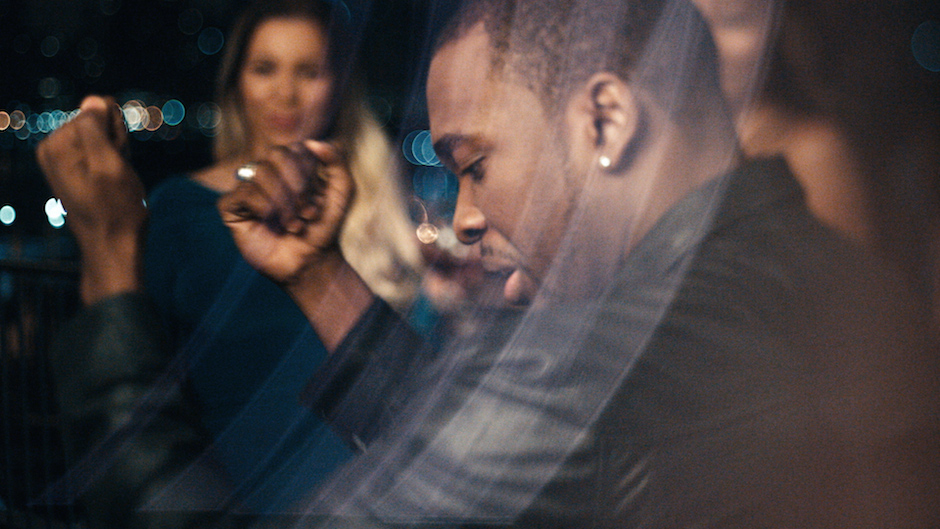
For the cast, that meant two basic techniques: anamorphic lenses subtly distorted through prisms and…lens-whacking. So let’s just get this out of the way: lens-whacking is not the coolest term. Something just doesn’t feel great about saying, “Alright – the lighting looks perfect — now let’s do some lens-whacking!” So instead, let’s go with the lesser-used term for the same technique: freelensing.
For those of you in the dark on this concept, FREELENSING (or, ugh, lens-whacking), is a technique where you hold an unattached lens up to the camera’s lens port and manually focus the shot by moving the lens closer or further from the camera. The technique allows stray light to leak into the port and flare the image, along with creating focus-distortions similar to tilt-shift and macro lenses. The effect is incredibly volatile; the image is constantly shifting, refracting the optics and internal mechanics of the iris within flare-patterns. It’s quite gorgeous with the exact kind of analog vibe that we were going for.
A word of caution: this is not the most camera or lens-friendly technique. Not only is your camera’s sensor completely exposed to dust and moisture but you could accidentally strike the sensor with the rear element of your lens, say nothing of the risk of scratching or dropping your lens. Some lenses are definitely much better for this than other lenses, and needless to say, I did not attempt to whack a Leica Summilux-C. Well, okay – I tried it once but thought better of it…
Our camera package came from TCS, where owners Erik and Oliver Schietinger were a huge help in putting together a set of vintage lenses for me. These were relatively small, Arri-bayonet mount lenses — some of which pre-dated the 1970s. The size of the lenses was perfect for freelensing — the rear elements could easily fit loosely within the camera’s lens port with plenty of air-space for light-leaks but just large enough that I couldn’t accidentally strike the image sensor. The set included: Zeiss Distagon 16mm and 24mm, Zeiss Planar 50mm, Cooke Panchro 25mm and 100mm, Kilfit Munchen 90mm Macro and a Zeiss Superspeed 50mm with the unique triangular iris pattern of the earliest generation Zeiss lenses. I found the 50mm Planar the most successful, though I liked the 90mm for close ups. Believe it or not, we shot almost all of the cast portraits using this technique: tiny old lenses from the pre-70s, unattached to the camera and hand-manipulated to find focus and allow light-leaks. In fact, we often created more extreme light-leaks by flaring the sensor with practical lights and even flashlights.
We also carried a set of anamorphic lenses to shoot a clean safety on the cast members in case this freelensing thing ended up looking waaaay too kooky once edited together. We still wanted the anamorphics to have an optically descontructed vibe so we tested a set of Japanese-made Kowa Prominar lenses – also dating back to the 70s – which had tremendous flares and haze. They looked amazing but became unavailable at the last second so we opted for a set of the brand new Spanish-made Scorpiolens 2x anamorphics by Servicevision, which are lightweight and gorgeous but a bit too clean for the look we wanted so I held a glass triangular prism in front of them to create refraction patterns and distortions.
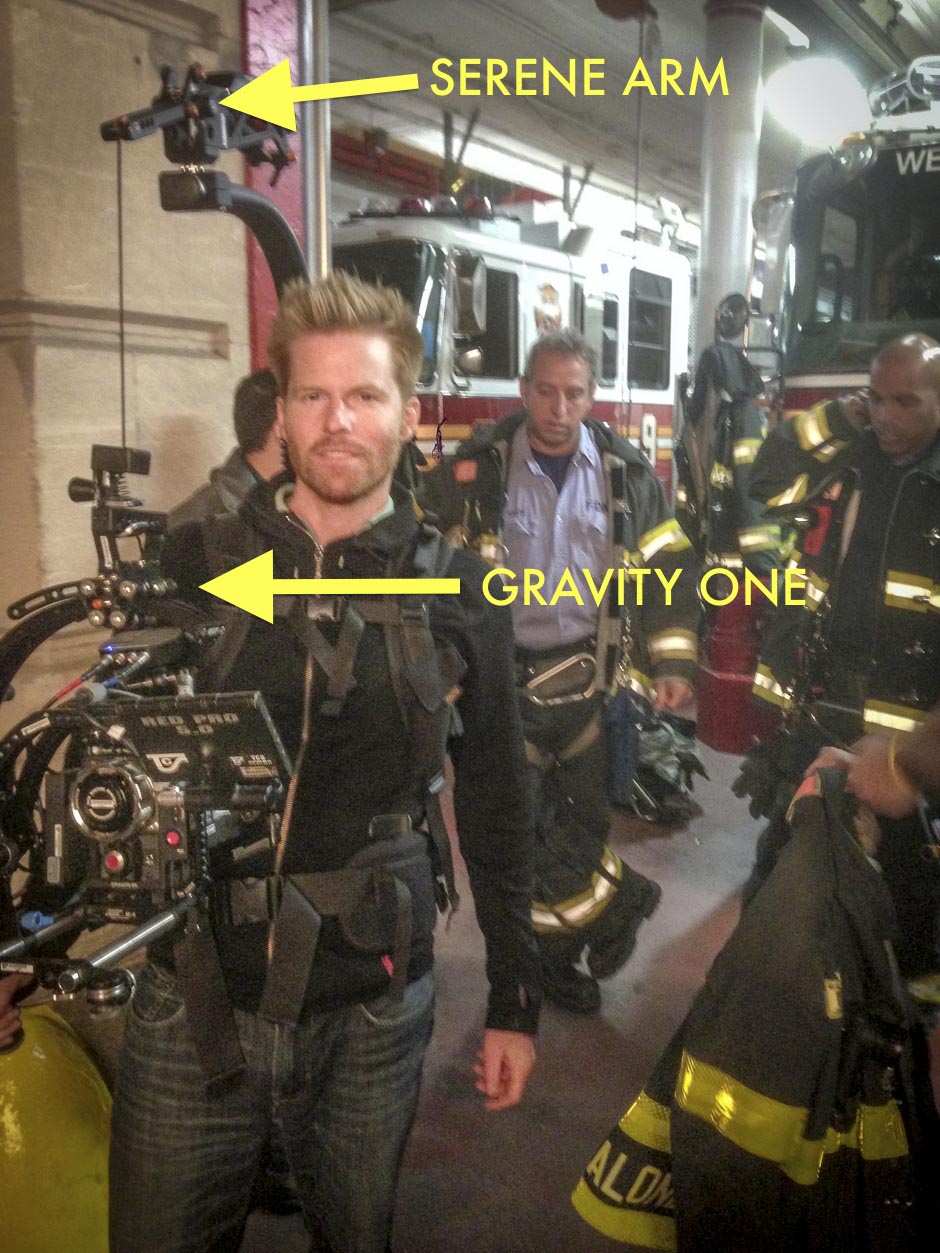
Another big hurdle for this freelensing technique was that I wanted to be handheld. Going handheld with a full size cinema camera while hand-holding a tiny lens and manually finding focus turned out to be pretty tricky. I knew an Easyrig would help manage the weight of the camera but I’ve never been super happy with the mechanics of an Easyrig. This device combines a Steadicam-like vest with an overhead arm and spring-loaded cord with a hook that grabs the camera from the top-handle and distributes the camera’s weight into your hips. It’s a little goofy-looking but it’s an incredible back-saver – vital for anyone hoping for longevity in this biz. Don’t ruin your back, my friends — your future-self will thank me! Having said that, operating with an Easyrig can be limiting due to the pendulum effect created by the tension cord. You can’t really tilt or roll the camera without fighting the cord, and the cord tension can sometimes amplify the bounce/bump of your footstep when walking with the camera.
I had been struggling with this love/hate relationship with the Easyrig for about a year when my fellow SNL DP-compatriot Jason Vandermeer introduced me to a then-prototype rig called the “Gravity-One” from FlowCine, designed to bridge the camera-Easyrig gap: it’s a mounting plate that cradles the camera within a tilt / roll two-axis handle (the EasyRig cord itself provides the pan axis). I saw the rig in person at NAB this year and thought it looked very promising so I mentioned it to the guys at TCS – who immediately purchased one and let me road-test it on the title sequence. In short: it’s amazing. Completely fixes my previous issues with the Easyrig. FlowCine also makes a spring-arm that mounts to the top of the Easyrig called the “Serene Arm”, which works to dampen those pesky footsteps that get translated into bumps whenever walking with the rig. I tested both rigs: the Gravity-One and Serene Arm, independently and together. Independently they’re each an improvement but together they’re the full package and I HIGHLY RECOMMEND seeking out this combo for your next handheld job.

Along with the variety of lenses, we also shot with a variety of cameras. Our main camera for the cast portraits was the Red Epic Dragon. While we’ve leaned toward the Arri Alexa over the past couple of seasons, we tried out the Dragon on a handful of spots and found it to be a huge improvement over the (Non-Dragon) Epic. As advertised, the dynamic range is much closer to the Alexa’s performance while the Dragon offers us a much wider range of resolution and frame rate options. For a handheld experimental title sequence with lots of different tricks, the Dragon was an easy choice. We started shooting the cast portraits at 6K resolution at 5:1 compression, thinking it would be very helpful to have a lot of room to re-frame shots, but after the first two cast-shoots (out of fifteen) racked up over 2TB of footage, we quickly dropped down to a more manageable 5K / 7:1 resolution. For the non-freelensing shots, we rigged the camera with a Redrock MicroRemote wireless follow focus and Teradek Bolt; for most of the shoot, the only monitor on set was a battery-powered 5.6″ TVLogic for Rhys to handhold. In addition to the Dragon, much of the bumper-footage was shot with a Canon 5DmIII. We even shot a couple bumpers with the same 5DmII and 16-35mm lens that I used for the 2009 sequence.
Once we had figured out our camera-approach to the cast portraits, I needed to find a fast but effective way to light them. The 2009 title sequence was lit entirely with a couple of small LED LitePanels; there was a raw-grittiness to the lighting that I wanted to improve upon while still maintaining the same verite-spirit. I also had a very small crew for this shoot. For the titles, I had my Key Grip Mort Korn, Gaffer Sean Sheridan and an AC – a floating roster of Alex Waterson, Alex Martin and Tom Greco. For the b-roll and bumpers, if was sometimes just Rhys, Justus and me. Our entire gear package fit into a single sprinter-van. Bear in mind: this wasn’t merely a budgetary restriction; we were zipping around to 5 locations per night, often in uncontrolled (public) spaces so keeping the crew and gear package small was just smart logistics. With that in mind, I knew I wanted one beauty light that we could run off house power for locations that we controlled and one battery-powered light for wild locations. For the big beauty light, we carried a Chimera OctaPlus with a mole-base socket, along with 1K and 500w globes on a 1K dimmer. For the battery light, our G&E vendor, Available Light New York, built a battery-powered LED-based JEM-ball on a boom pole which they call the “American Hustle” rig (those of you who’ve seen the “American Hustle” behind-the-scenes featurette know what I’m talking about). My gaffer, Sean, also built an LED-based battery-powered china ball and we were wielding dueling battery-powered china balls for Bobby Moynihan’s bowling sequence. We also carried my personal set of BBS Area48 remote phosphor LED lights — which are pretty amazing for their high CRI index and high output while battery-powered.
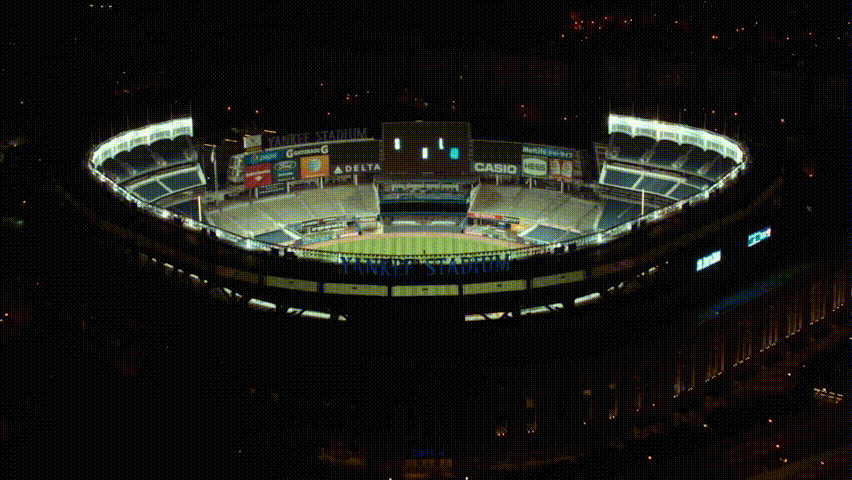
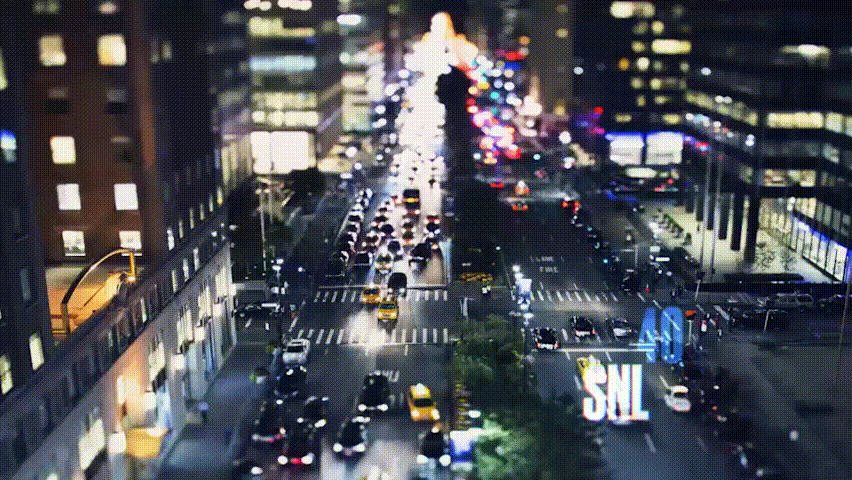
One of the early mantras of this sequence was to create a “Love-letter to New York”, and one of the first visual ideas was to go up in a helicopter and shoot some A-Grade aerials. (In fact, we’ve been talking about shooting aerials for as long as I’ve been at SNL but in my now fifteen seasons, we’d never actually done it.) We knew that aerials would immediately add a classic, high-end gloss to the sequence and celebrate the unique and beautiful New York skyline. There are a lot of ways to shoot aerial footage these days; we could fly a DJI Phantom with a GoPro, mount a Dragon to a Freefly Cinestar drone, handhold a MoVI out an open chopper door…or we could just hire the best aerial pilot in New York – Al Cerullo – which is what we did. Al’s credits include The Wolf of Wall Street, Spiderman, X-Men, Captain America…pretty much any big movie shot in New York that needs aerials. Al provided the helicopter, camera operator (Brian Heller) who he’s been working with for years, and CineFlex rig. We had the choice of either an Alexa-M or an Epic Dragon. We chose the Alexa because with the Epic, the helicopter would have to land every time we needed to change media or batteries – which would severely eat into our shooting time. With the M-model Alexa, the camera and lens port are separated by a cable, allowing the lens to be in the gimbal on the front the chopper while the camera body is inside the chopper itself for changing media and batteries. (Fun fact: the Alexa-M was named “M” for Marie Antoinette…I’m sure you can figure that one out on your own). The Alexa was mounted with a Canon 30-300mm zoom and set at 800 ISO. One of the coolest moments was a fly-by of Yankee Stadium, where Rhys had somehow pre-arranged for the SNL logo to appear on the jumbo-tron. We rented the chopper for 4-hours including transit time and ended up with nearly 3-hours of gorgeous footage – and: yes, it was one of the bigger line items on the budget but for the production value they add, great aerials are worth every penny.
With a bed of beautiful aerials as our b-roll base, we wanted to include a street-level version of the same type of smooth traveling footage, so we mounted our Epic Dragon to a MoVI M10. I’ve recently really loved the combination of the Dragon with Leica Summicron lenses on the MoVI, but I still wanted to maintain an optically-degraded, old-school quality so we picked up a set of Canon K-35 primes (again, from the 70s) – light weight and fast at T1.5. I asked Sam Nuttman from Freefly Systems (makers of the MoVI) for his best advice for driving shots: insert car? back of pickup? side-door of mini-van? He actually recommended shooting out of a sunroof, so we rented a baller Suburban and spent an evening driving through the city while I held the MoVI through the sunroof. Sam was right: the sunroof gave us 360˚ views of the city without the obstacle of the car itself to shoot around. I’m still amazed at how well the MoVI works in that kind of application. The car was bouncing around…I was bouncing around…the MoVI rig was bouncing around and getting blasted with wind…the footage was silky smooth.
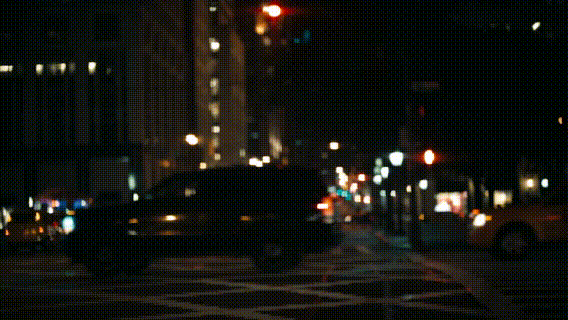
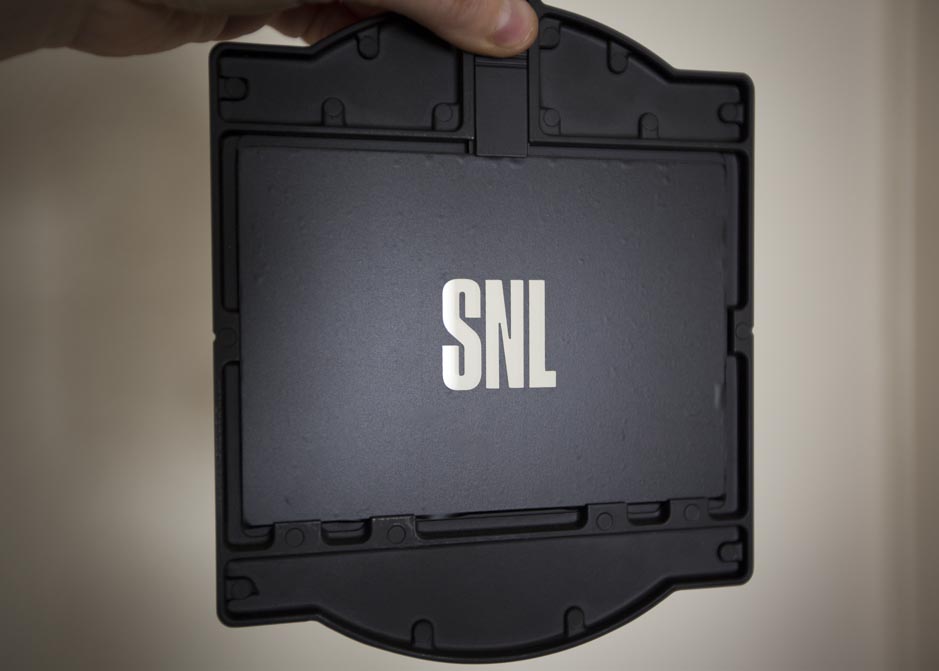
Our most experimental footage was relegated to the interstitial bumpers – so if you watch the show, watch out for them during the commercials this season. One of the tricks I was most excited to try was a custom bokeh technique. This one looks like a magic trick. As we all know intuitively, when a light source is thrown out of focus – be it a lamp, car headlight, traffic light, etc – it turns into a soft ball of light. The shape of the out-of-focus light is called the “bokeh” (Japanese term), and is actually a reflection of the shape of the iris of the lens itself. So here’s the trick: you can change the shape of that round ball into whatever shape you choose by creating a custom bokeh filter. If the shape of the filter is smaller than the diameter of the iris, the out-of-focus bokeh will magically take the shape of the filter in place of the iris.
Here’s how it works: we wanted the bokeh to be shaped like the SNL logo, such that when we racked focus, every light source in the shot would turn into the logo. Street traffic would turn into a river of SNL logos, with the logo changing from red to green in the traffic lights…
In order for this effect to work, the logo would have to be smaller than the diameter of the iris of the lens. In order to figure this out, you need to use a simple formula:
(F)ocal length / (T)-stop = (D)iameter
So a 50mm lens at T2.0 = 25mm diameter.
That means I needed to create a 4×5 filter mask with a logo that would fit inside a 25mm circle. I brought the logo into Adobe Illustrator, re-sized the logo to fit within a 25mm diameter and placed it within the frame of a 4” x 5.6” rectangle — which is the size of the glass filter I was using. We sent the Illustrator file to our sign printer who has the ability to print black laser-cut vinyl stickers. Then we simply took the vinyl sticker and adhered it to a 4 x 5 clear filter. Voila! We had a custom SNL-logo bokeh filter. For these shots, we picked up a set of Leica Summilux-C lenses. I experimented with different lenses and different sized-filters, but the best results were with the 50mm.
For another bumper shot, we wanted to shoot a tilt-shift timelapse to “miniaturize” an iconic city scene. Shooting timelapse with a tilt-shift lens is a well-heeled trope, but for those who have never tried it: a tilt-shift lens allows you to “tilt” the focal plane, creating a narrow band of focus. When you shoot tilted shallow focus time lapse of – say, a cityscape — our brains are tricked into interpreting that bustling cityscape as a miniature, like an electric train set. Shooting from a slightly high angle (to mimic how you would traditionally look down at a miniature) and with a fairly fast shutter speed to decrease motion blur and create choppier movement helps increase the optical illusion. In the case of this bumper, we shot out of a 7th floor window at the base of Park Avenue, which offered a perfect high angle shot looking north up the canyon of traffic. I used a Canon 45mm TS (Tilt/Shift) and shot the scene at F2.8 at 1/25th sec at 800 ISO, with a 1-sec interval between shots.
Coming full circle back to Rhys’ idea that spurred this whole lo-fi concept in the first place, we wanted to incorporate light-writing into one of the bumpers. After researching local light-writing artists in New York and even investigating a light-writing troupe in Germany, it donned on us that this would be a great way to try out a new toy called the Pixelstick. Rhys and I had both seen the Kickstarter campaign for Pixelstick a few months ago and I’ve seen some cool images from friends who were early-adopters, but the concept didn’t really sink in until we were on this light-writing trip.
The Pixelstick is one of those amazing ideas that is hard to explain but once you see it, you immediately get it. In short, it’s a portable, lightweight bar containing 200 RGB LEDs. You can upload the device with an image in the form of a 200 pixel-tall 24-bit BMP (bitmap) file via SD card. When you trigger the bar, it flashes your image in a succession of pulses, one vertical line at a time — each LED corresponding to a single pixel. If you photograph this pulsing with a long exposure and you move the bar across the frame as it pulses, you literally “paint” the image in midair. I know – very hard to wrap your brain around that until you see it in action, so here’s a little BTS video of the Pixelstick on one of our bumper shots:
And here is how that shot turned out after a 10-second exposure:
![]()
Now imagine that’s 1 frame of a 10-second shot. We shot that same frame over and over until we had about 40 frames. Technically we needed 240 frames for a 10-second shot but with a few dozen frames, we could sequence a timelapse shot by randomly repeating frames without it being noticeable. The result is a shot that combines the look of a graphic with a handmade, stop-motion quality — another really fun in-camera trick.
![]()
This was just the tip of the iceberg as far as what’s possible with the Pixelstick. We were lucky enough to have the creators of the Pixelstick – Duncan Frazier and Stephen McGuigan — give us a primer on some more advanced tricks, and we’ve already shot a few other Pixelstick bumpers that will make their appearance in the coming episodes.
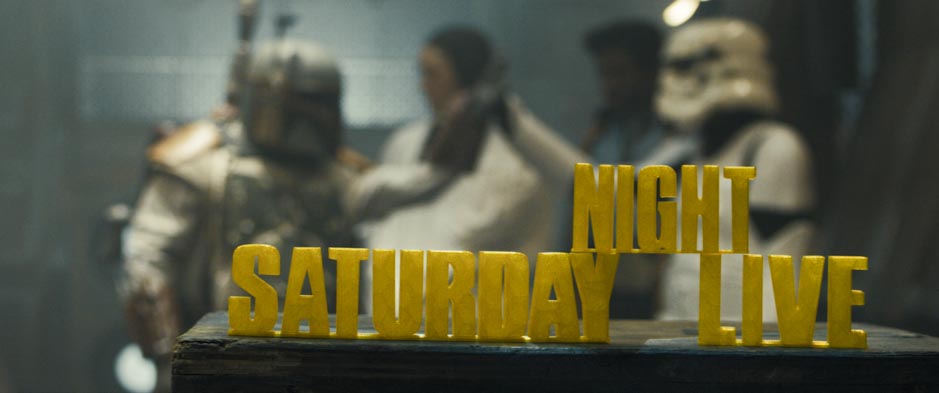
The last in-camera bumper idea that we tried was perhaps the most literal. The bumpers are essentially: a 10-second shot with an SNL graphic overlaid. But…does the graphic really need to be overlaid in post? Of course not! We had the new logo 3D-printed into a physical object about 4 inches tall, and have had a lot of fun shooting an ongoing series of what we’re calling “Makerbot” shots – placing the plastic logo around the city and even on set with us. If you watched the Chris Pratt / Season Premiere, you might have seen our Makerbot-bumper shot on the set of of our Guardians of the Galaxy parody trailer.
On the post side, the massive task of wading through the 4+TB of footage was handled by editor Sarra Idris in just a single week. The title sequence and bumpers do, of course, incorporate graphics. Pentragram’s original graphics treatment was for a very cool cathode ray / video-smear look that evoked a retro-80s feeling, but in response to the actual footage, Rhys – along with Emily Oberman at Pentagram and Flame-artist Kyle Derleth – pushed the style back a decade, incorporating the prismatic / optically-distorted quality of our camera original footage. Kyle also added a subtle motion-track to the titles which made them feel even more like in-camera lens aberrations rather than a post production addition.
Finally, our colorist was the phenomenal Tom Poole from Company 3. Tom started with a print emulation LUT similar to the one he previously created for Drive, keeping the contrast and colors within the restricted range that could be printed back to film. Doing so keeps the blacks from getting too crushed and keeps the whites from pushing into the hyper-contrast video realm. While the result is technically less range than what video can achieve, this is a classic case of “less is more”, resulting in a much richer, more cinematic look. We had actually planned to incorporate some black & white into the sequence and Tom created an absolutely gorgeous b&w version of the footage but in the end, the color version just had so much pop that Rhys opted against using any b&w.
For me, the titles are kind of like the Olympics or the World Cup — every four years they completely take over my life for about 3 weeks. This go-round was particularly satisfying to have the opportunity to try so many different experimental in-camera tricks. The fact that one of the longest running-series in TV history is so open to having its title-branding re-invented with such non-traditional techniques is a credit to both the producers’ faith in our director Rhys and to the show’s own counter-culture roots that began back in 1975, some 40 years ago. On a personal note, the titles are a rare opportunity to spend more than just a single fleeting day on a project with my SNL team. While we had a few days of full-scale production, the majority of our 3-week shoot was basically: a few friends hovering around a camera in the middle of the night, trying to come up with something cool.
To see how the final title sequence turned out, click here.
And if you’re interested in learning more about my process, check out my cinematography workshop — available as an HD Download at www.visualstorytelling.com.