Part of the fun of writing this HOW WE DID IT for the SNL short film “The Midnight Coterie of Sinister Intruders” will be finding out how we actually did it, because quite honestly, it’s all kind of a blur…
Let’s start at the beginning.
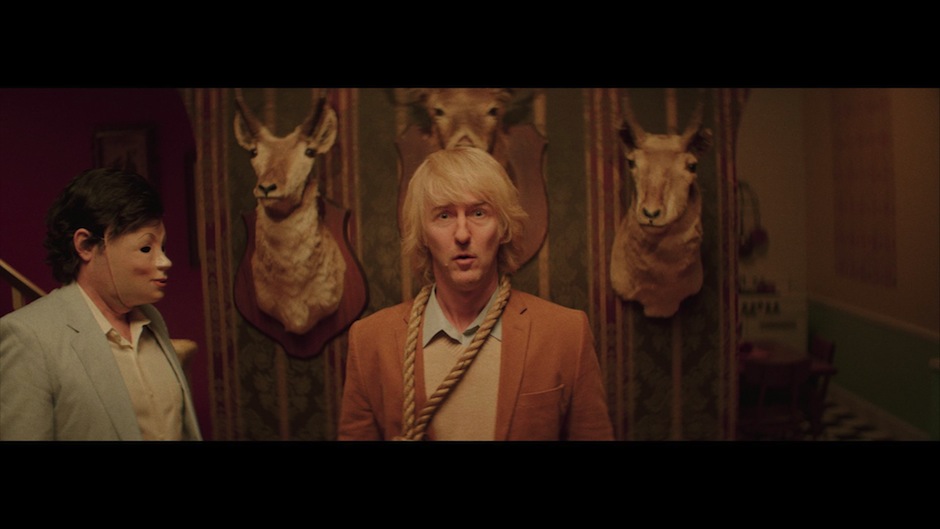
This spot was simply titled, “New Horror Trailer” and when I first glanced at the script on a Wednesday night, I figured it was going to be a Halloween-appropriate horror film spoof. It wasn’t until the 2nd page that the voiceover reveals: “From the twisted mind of…Wes Anderson”. Wait – this is a Wes Anderson parody? Hell yes! And right off the bat, I gotta give props to writers John Solomon, Rob Klein, Chris Kelly and Sarah Schneider for this keenly observed mash-up of a classic home-invasion horror with the hand-crafted charm of a Wes Anderson film.
For those of you who attended my Visual Storytelling workshop, you know that I spent a fair amount of time deconstructing the work of Wes Anderson. Needless to say, I could not have been more excited to take-on the parody challenge of emulating one of my favorite filmmakers. This is the kind of SNL spot I live for.
Very quickly, however, it became clear that this was going to be a very different type of challenge. Wes Anderson is one of the most idiosyncratic filmmakers of our time; his style is so unique that you might think it would be easy to satirize. But here’s the problem: turns out everyone has a different opinion about what MOST distinguishes Wes Anderson’s style. Is it the limited color palette? Flat space camera moves? Symmetrical compositions? Snap-zooms? Twee, hand-crafted art direction? Slow-motion walking shots? Clearly it’s all of those things and more, but within the limited context of a trailer, which are the most important signatures to include? And within a subculture as film-literate as the writers and producers of SNL, we were surrounded by astute Wes Anderson connoisseurs. Suddenly this spot had morphed from something I was dying to shoot into something I was terrified to shoot!
One thing was immediately clear: there is no way we were going to find a location that would look enough like Wes Anderson’s “World” – we would have to build sets. The script called for a living room, kitchen and bedroom, along with a handful of tableau sets for character introductions (such as “closet full of antique typewriters”) – all of which we could build on stage. But the script starts with a misdirect — a classic horror trailer setup: the spooky night exterior of a cabin in the woods being descended upon by shadowy intruders – which we knew we could NOT shoot on stage. Also bear in mind: the SNL office is in the middle of midtown Manhattan…not exactly the prime spot to find a “cabin in the woods” location.
There was, however, one clever option that we had previously employed on a spot from last season – another trailer parody, “Djesus Uncrossed”. Steiner Stages in Brooklyn – a premiere sound stage facility — is located within the Brooklyn Navy Yard, which also contains a bunch of disused Naval Officer residences: boarded-up, overgrown, condemned old mansions. Not exactly the back lot at Universal Studios but perfect if you’re looking for a spooky old cabin in the woods.
Set design began as soon as the spot was green lit on Wednesday night. Our unflappable Art Director, Andrea Purcigliotti, designed a handful of sets with our director, Rhys Thomas, with an emphasis on symmetry. The largest set was the living room – a 20’x20’ space with perfect symmetry on all four walls: matching doorways, matching archways, windows and bookshelves balanced on all sides. This would give us opportunities to design symmetrical compositions no matter what direction we shot in. The kitchen and bedroom sets were a little smaller but followed the same principal.
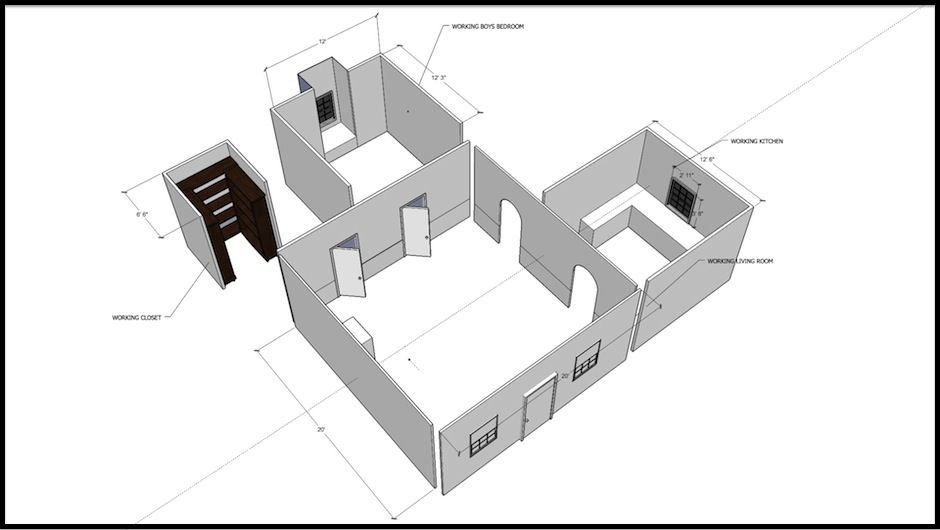
The kitchen was originally laid out at 12’x12’ but on the shoot day, Rhys recognized that it would give us a more fun perspective shot if the kitchen were abnormally long so Andrea added an extra 8’ to make the set an exaggerated 12’x20’. A black&white checkered-tile floor enhanced the almost forced-perspective feeling.
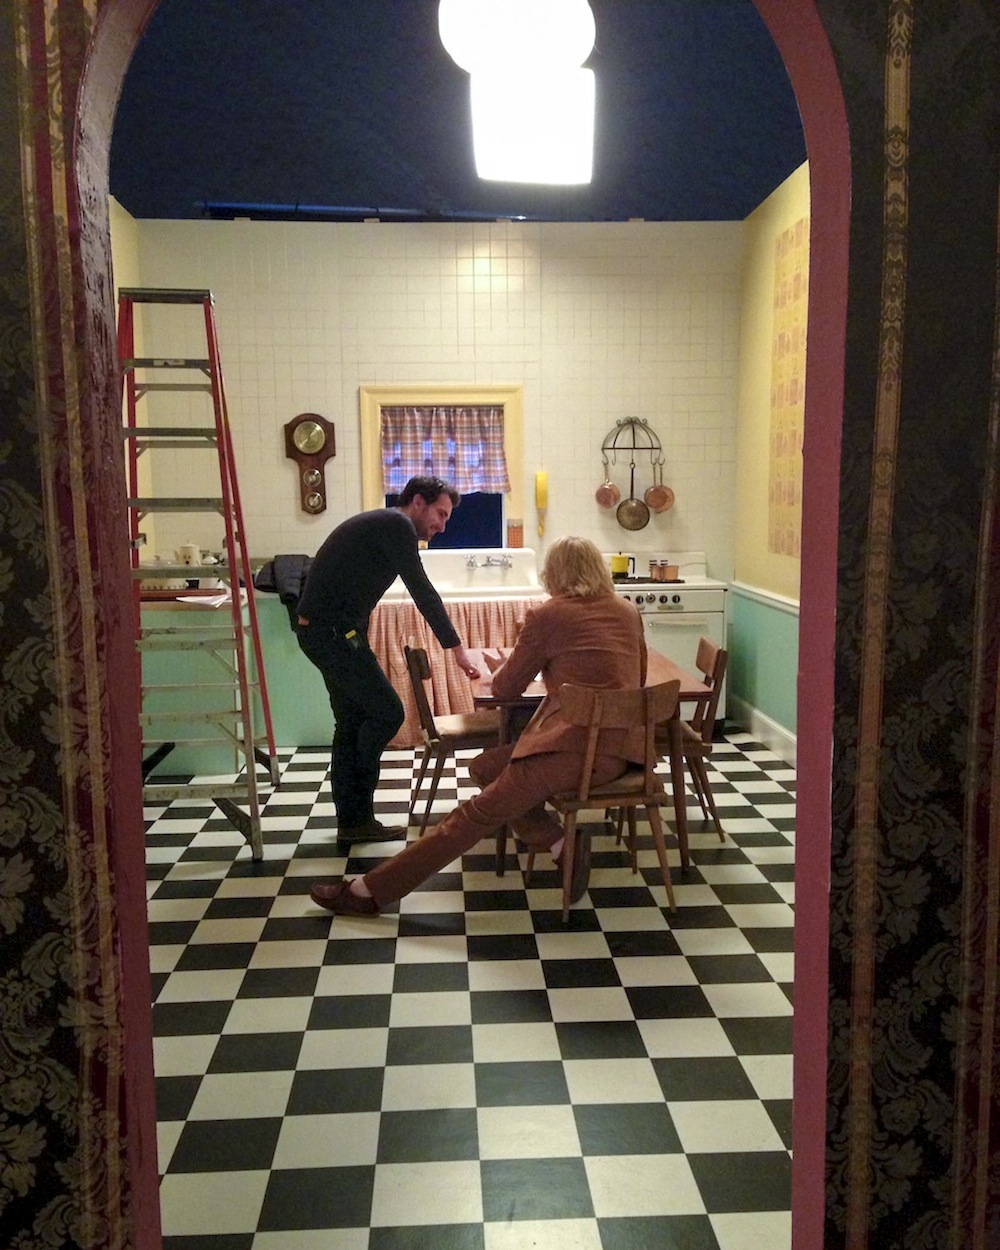
Director Rhys Thomas chatting with Edward Norton
Wes Anderson loves his controlled color palettes and we debated the color of the sets on this spot more than any other spot I’ve worked on. Eventually we combined the dark pink signature color of “The Royal Tenenbaums” with the wall-papered flourish of “Rushmore” for the living room along with the faded yellow and teal palette of “Life Aquatic” and “Moonrise Kingdom” for the bedroom and kitchen.
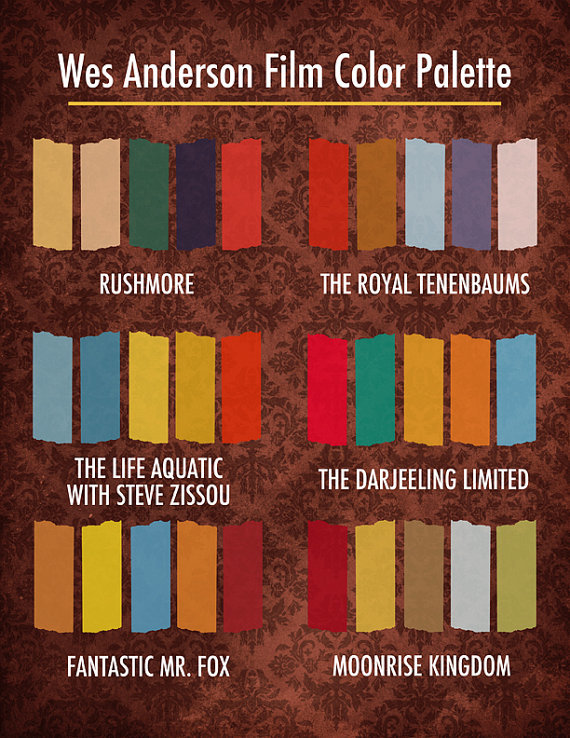
created by bethmathews.com
Next up on the prep day was a location scout of the Brooklyn Navy Yard. We didn’t find a cabin in the woods but we did find a former Naval surgeon’s residence that looked more like a haunted French chateau – which seemed somehow even more appropriate for Wes Anderson’s style. The building was covered in ivy and overgrown trees but with a little grooming and dressing up, we thought it would work perfectly.
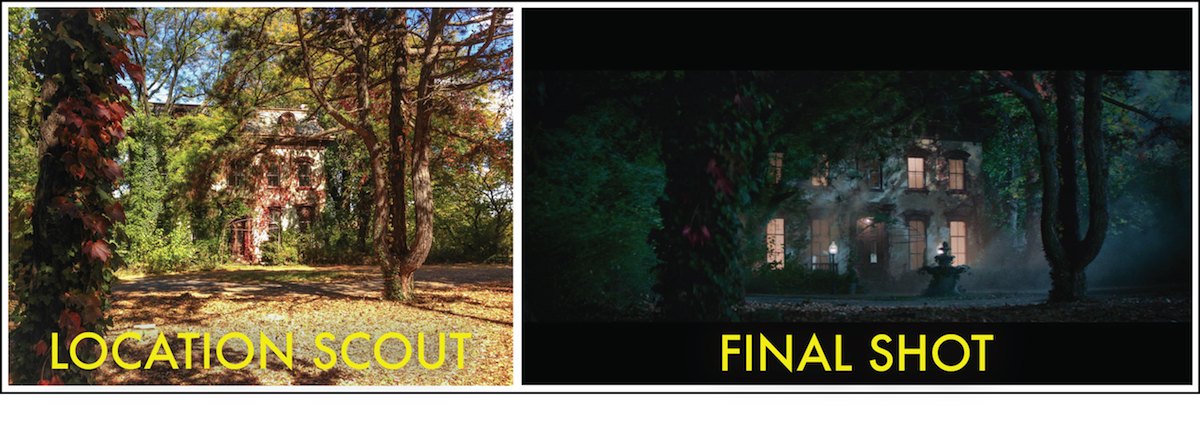
To establish the mash-up joke, the opening night exterior sequence was supposed to look like a contemporary horror film (think: “Cabin in the Woods”, “The Purge”, “The Strangers”), not a Wes Anderson film. To me, that means a lot of hard “moonlight” backlighting trees and throwing shadows on the house. To achieve this look, we would need some big lights high above the 3-story house and treeline, which meant this was going to a fairly big lighting setup by SNL standards. I ordered an 80’ condor lift with two Arri T24 fresnels – which are 24k tungsten lights. Positioning a condor for a large night exterior setup is always tricky because it takes a long time to setup; if you guess wrong and have to move the condor, it’s going to cost you a lot of precious time on your shoot day.
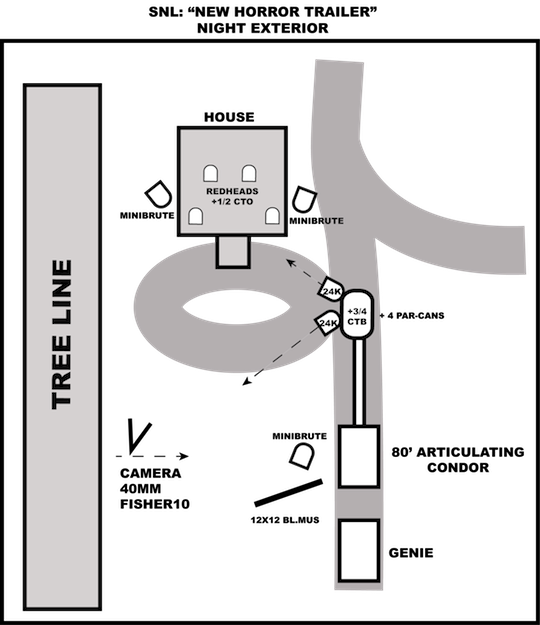
My gaffer, Keith Devlin, and I spotted an area on the main road for the condor chassis where we could elevate the bucket of the lift so that one of the T24s was front-lighting the house though a tree, casting contrasty shadows. The other T24 was aimed 90˚ back toward the camera position, backlighting the trees and ground in front of the house. We placed a few par-cans with narrow beam globes in the condor so that we could light any specific smaller areas from the condor as well. I added ¾ CTB to all of the lights in the condor to achieve the saturated blue moonlight look that I associate with contemporary horror films. On the ground, I bounced a 9-Light Mini-Brute off a 12’x12’ bleached muslin to add some soft, very dim ambience. Mini-Brutes are nice because you get about 5,000 watts of light from 9 individual globes so you can easily control the output by just switching off lamps. They’re also relatively small and easy to move around. I added two additional Mini-Brutes on the ground behind the house, up-lighting the trees to separate the edges of the house. Inside the house, we picked four windows and dressed them with sheer curtains, then backlit with 1K open face redheads to give the house a warm interior glow. Again – this was a fairly big lighting setup for us, no doubt. Our call time to rig the shot was 2pm and, with a crew of four grips and four electrics, we were ready to shoot by the time the sun went down at 6pm.
Meanwhile, back on stage – which was only a short walk down the hill — I had a separate crew of three grips and three electrics pre-lighting the sets to be ready for when we finished the night exteriors. The biggest task was setting up a lighting balloon over the living room set. I used an Airstar 4K Elliptical (via Available Light New York). It’s got a flattened sphere shape with about an 8’ diameter and is easy to skirt. The balloon light is filled with helium and it simply floats over the set to create a very soft top-light with no rigging. Let me explain: yes – we’re on a very nice sound stage with a grid that is built for hanging lights, but hanging lights can be enormously time consuming. Not to mention – since the lights would be hung over the set – working from the grid would delay the art department from dressing the sets until the grips and electrics were finished rigging. ENTER: the lighting balloon, a simple tool that floats up over the set with no rigging and – voilà — beautiful, controllable, soft top-light very quickly.
The rest of the sets were very simply pre-lit. I placed 4’ 4-bank Kinos over the windows with 5600˚ globes for a full blue night look. I placed a 30” JEM Ball over the kitchen – which is basically an easily rigged Chinese lantern with a 1,000w globe inside. I also placed Rifa lights over the windows for warm soft backlight. Rifa lights are pretty old school but they’re so lightweight and easy to rig (and inexpensive!) that I find myself using them all the time. Finally, I rigged an MR-16 strip-light gelled with full CTO behind the fireplace and used a Magic Gadgets Shadowmaker flicker box to create a warm firelight effect.
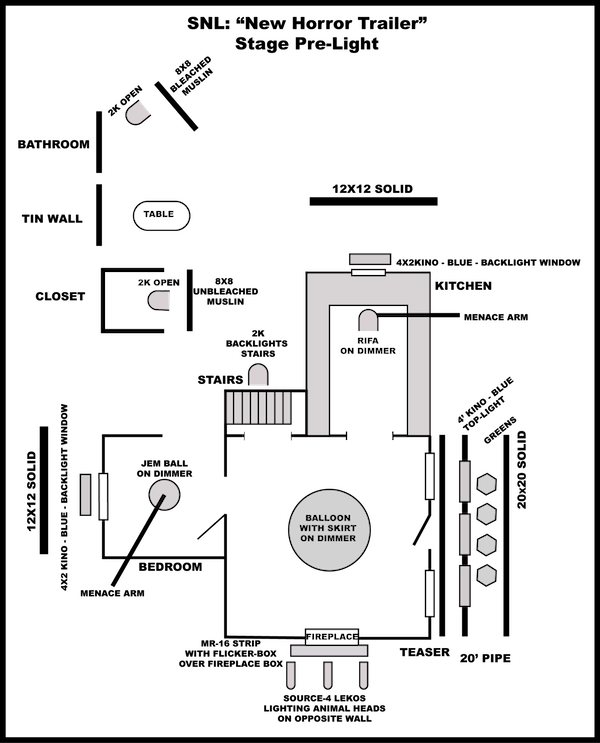
In addition to this pre-rigging, I knew I would use a large soft bounce source as the main keylight for most of the scenes on stage. To my eye, that’s how I think Wes Anderson’s DP, Robert Yeoman, lights many of their scenes. I used a 2k open face bounced into an 8×8 unbleached muslin. Using an un-bleached muslin creates a warmer look than a bleached muslin, more like the look of a household lamp. I also kept the 2k on a dimmer so that I could dim it down into an even warmer source. Our Set Decorator, Ipek Celik, did such a great job of carefully dressing the sets, as did Brian Hemesath with the dead-on costume design, and my strategy was to simply illuminate the scenes with soft, semi-contrasty light, allowing for graphic, wide-angle compositions.
Which brings us to a discussion about the camera package. Wes Anderson’s first few movies were shot on film stock using anamorphic lenses (Panavision Primos), with a 2.39:1 widescreen aspect ratio. Interestingly, “Moonrise Kingdom” was shot Super16mm with a 1.85 aspect ratio, which allowed for the more vertical compositions that Anderson and Yeoman were going for. “Fantastic Mr. Fox” was shot with a DSLR – which is not surprising since that is how most stop-motion is shot these days – and was also framed for 1.85. Anderson’s next film, “The Grand Budapest Hotel” is back to film stock and apparently combines 1.37, 1.85 and 2.39 – different aspect ratios for different parts of the movie!
We decided to emulate the more classic “Tenenbaums” and “Rushmore” format with a 2.39 aspect ratio. We’ve shot plenty of spots in the 2.39 format at SNL but we’ve always used normal lenses and cropped the shot with a 2.39 letterbox in post. Well, we decided to go all the way with this exercise and shoot anamorphic, due in large part to Rhys’ experience shooting anamorphic for a feature he directed this past summer, “Staten Island Summer“.
Before I launch into our specific camera setup, let’s chat for a second about shooting anamorphic. “Anamorphic” is one of those fetishized terms among cineastes that not everyone completely understands. Simply put, an anamorphic lens is a normal lens with an added front element that “squeezes” the image 2:1, creating a tall, skinny distorted picture that is later “unsqueezed” in post, becoming a widescreen image. Anamorphic lenses are sometimes referred to as “scope” lenses, whereas non-anamorphic lenses (normal lenses) are referred to as “spherical” or “flat” lenses.
To make matters even more confusing, the anamorphic widescreen aspect ratio is often indiscriminately referred to as 2.40, 2.39 or even 2.35. To clear things up, the true anamorphic aspect ratio is 2.39. Sometimes that is rounded up in vernacular to 2.40 (two-four-oh) but that’s a misnomer — it is not 2.40. Nor is it 2.35, which was an early anamorphic format specifically referring to films exhibited between 1958 and 1970. Anytime you hear any of those three formats referred to, it means 2.39:1 aspect ratio.
What’s the point of shooting anamorphic instead of just shooting with normal lenses and letterboxing the image? First of all, there are some major optical differences in the image. An anamorphic lens gives you the horizontal angle of view of a spherical lens that is half the focal length, yet retains its optical compression and depth of field. So a 40mm anamorphic gives you the same horizontal angle as a 20mm spherical, yet with the compression and depth of field of a 40mm spherical – which looks dramatically different.
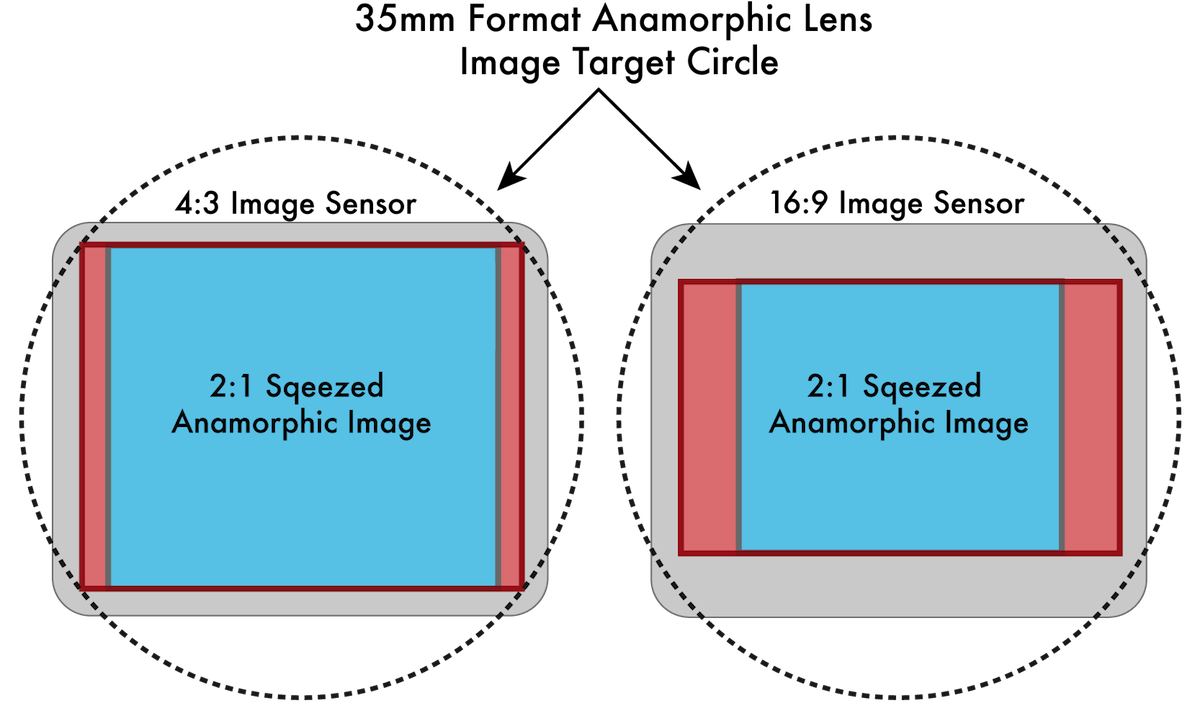
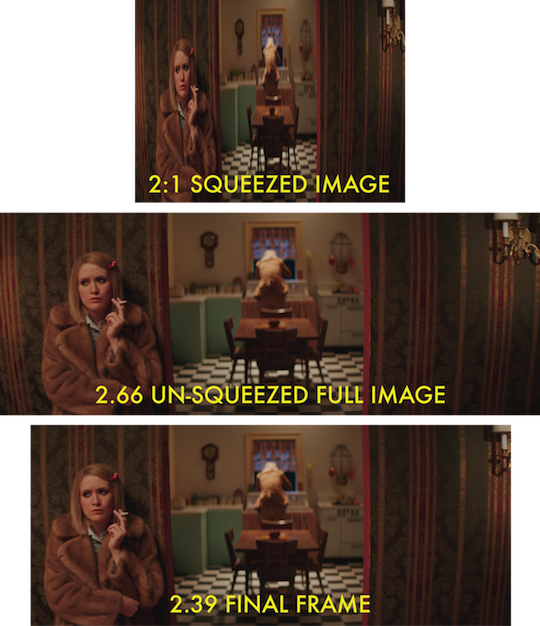
Now this next part is going to get a little complicated because there are a few variables. At a more fundamental level, shooting anamorphic allows you to make every pixel count. By squeezing the image at a 2:1 ratio, the anamorphic image fills the sensor from top to bottom with your 2.39 frame. We were shooting with an Arri Alexa Plus, which has a 4:3 sensor – which is much taller than the Super35mm sized sensor that is in most other digital cinema cameras. This is critical because a squeezed anamorphic image is twice as tall compared to a normal image.
By shooting anamorphic with the Alexa Plus 4:3, we were using the full height of the sensor, allowing 2582 x 2160 resolution. Now, comparing apples to apples – using the same camera – shooting 2.39 with a normal lens and letterboxing the image reduces the usable resolution to 2880 x 1206, with the rest of the image hidden under the letterbox. Do the math: you’re comparing 5,577,120 pixels to 3,473,280 pixels. In other words, shooting anamorphic with a 4:3 sensor gives you 38% more usable resolution. On the other hand – and counterintuitively – if you combine anamorphic lenses with a 16×9-sized sensor, you will actually get a significant loss in resolution. An anamorphic frame fit into a 16×9 sensor will only fill 66% of the sensor. Yikes. Point is: if you want to get the most out of an anamorphic image, I recommend using a camera with a 4:3-capable sensor that will accommodate the “tall” squeezed image that anamorphic lenses produce.
A 4:3 sensor has a native aspect ratio of 1.33, but when you “unsqueeze” the 2:1 anamorphic image, you get an image that is double-wide, or 8:3. So even though you are framing 2.39, you are actually capturing 2.66 – an even wider image. That gives you some latitude to reframe the image right or left in post if need be.
What is the effect of all this? You end up with a 2.39 aspect ratio, yet with dramatically more image compression and shallower depth compared to shooting with spherical lenses. The image is also processed at higher resolution – which means less noise and a richer/sharper image. Other optical effects include out of focus highlights that have an oblong bokeh and horizontal, sometimes blue lens flares (see: any JJ Abrams movie).
Back to our shoot. Along with the Alexa Plus, we had a set a Hawk V-series lenses from Vantage (via rental house TCS), specifically: 40mm, 50mm, 75mm, 100mm and 135mm. Wes Anderson favored the 40mm anamorphic on his earlier films and we, too, found the 40mm to be the most useful to create that signature look, which includes a bit of cylindrical distortion on the edges of frame. We ended up using the 40mm on 90% of the shots. One big exception was for the night exterior “Binocular POV” shots, wherein Rhys wanted to play with snap-zooms, so we needed a zoom lens. Unfortunately, it can be hard enough to source good anamorphic prime lenses, let alone a high quality anamorphic zoom lens, so for the binocular-POV shots, I had my 1st AC, Paul Schilens, add a non-anamorphic Optimo 24-290mm to the package and we just cropped for 2.39. I have to admit, bouncing to the Optimo zoom for the binocular POV was a tad disappointing after shooting with the Hawk anamorphics. The difference is immediately recognizable; while the aspect ratio is the same 2.39, the anamorphic image appears more “present” and graphic – due in large part to the longer lens compression and shallower depth.
One disadvantage of anamorphic lenses is that they don’t focus as closely as most spherical lenses. In the letter-reading sequence, Rhys wanted to shoot extreme close-ups of the letters, filling the frame with just a single word. I used a +3 diopter to focus as closely to the letter as possible and we still didn’t get as close as we would have liked. In retrospect, I would have been better off using a macro spherical lens for those shots.
Another key touchstone of Wes Andersonian cinema is the use of very crisp whip pans that land dead solid, usually on a perfectly symmetrical frame. Now I am a big fan of the O’Connor 2575 fluid head, but admittedly, performing a whip-pan that lands dead solid on a set frame is a fool’s errand with a fluid head. This kind of operating calls for a geared head, and there’s even a way to take the operating precision one step further. I mounted a Scorpio 2-axis remote head on a Fisher10 dolly – something I would rarely do – but the remote head allowed me to set limits on the pan and tilt wheels. I could set my frame on either side of a fast whip-pan, turn the dampening up on the controls and then just spin the wheels to nail the move every time. Bear in mind, this trick is only useful for hitting a very specific frame that is not changing (so it’s not great if you’re following an actor’s movement). The other advantage of using a remote head on a dolly in this case is that our sets were very small and it made the operating much easier to be out of the way. In one shot, Ed Norton-as-Owen Wilson says, “C’mon kids – get in the panic room!” and the camera whips off his gesture 135˚ to a yellow tent setup in the living room. Performing that 135˚ pan was much easier to operate remotely rather than physically moving my body around the camera and dolly.
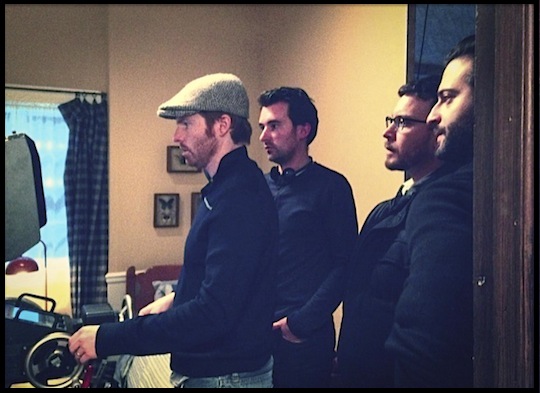
Operating the Scorpio Head. (Left to Right: Alex Buono, Rhys Thomas, Justus McLarty and Adam Epstein)
For another fun shot, we wanted to track behind a paper airplane as it flies through the house. Our original plan was to use a 3-axis remote head on a crane arm, mounting the plane in front of the lens so that we could “fly” the plane by tracking forward while rising and lowering on the crane arm, using the roll axis to simulate the fluttering yaw of a paper plane in flight. Nice idea…then we returned to planet Earth and mounted the plane to a handheld camera that I walked through the house, rolling the camera as I walked to simulate that fancy 3-axis remote head. Ha.
I’d be remiss if I didn’t mention the homicidal stop-motion mouse at the end of the spot. This was one of those little gems in an SNL script that I loved but figured we couldn’t actually shoot because we just wouldn’t have the time. Fortunately Rhys held his ground and found an outside animation company called Dancing Diablo that created this shot for us. The mouse was made by our longtime specialty-prop fabricator, Dan Castelli, who somehow built this entire perfect little model over Thursday night! Dancing Diablo was provided with the mouse model and the background mini-set along with very specific directions from Rhys, including instructions to replicate the animation style of “Fantastic Mr. Fox”, which itself paid homage to the old school style of stop-motion pioneer Ray Harryhausen. So, for instance, each frame was shot twice for less fluid motion and the mouse’s fur was animated, just like in “Fantastic Mr. Fox”, to call attention to the stop-motion style.

Director Rhys Thomas and his Homicidal Mouse
If I haven’t adequately expressed how long and complicated this shoot had become, let me headline it: I was on stage at 10am Friday morning with Rhys (director) and Justus McLarty (producer) along with Andrea (art director) to walk through/tweak the sets as they were being painted. The animation unit started their day at 3pm and (somehow) had a finished shot by 3am. Meanwhile our night exterior crew arrived at 2pm, our stage crew arrived at 5pm and we all finally wrapped at 7am. Saturday morning. As in: the day of the show.
Hilariously (in retrospect), a little side-story is that I had agreed to be a speaker at a big New York photography event on that Saturday called PhotoPlus Expo. So now it’s 7am and I’m giddy by what we’d just pulled off but also exhausted beyond comprehension… and I had a 3-hour lecture starting in about an hour. Needless to say, the lecture went by like a fever-dream; I have no memory of it but I hear it was well received…
But that is not where this story ends, for as soon as I finished the lecture, I got a call that we had more to shoot! Alec Baldwin was already appearing in the Opening Monologue and he agreed to do the voiceover for our spot so he was added to the “character tableau” sequence, appearing in the recording booth for, “…and Alec Baldwin as the Narrator…”. Love it! How perfect – the voice of “Tenenbaums” would be the perfect way to tie this all together. So it was back to 30 Rock with yet another crew – this time, just my 1st AC, Nick Demas – and a very simple shoot in a recording booth with the same Alexa/Hawk camera package.
By now it’s 6pm on Saturday evening. Rhys and I had been reviewing the color grade from our colorist, Emery Wells, while he and our editor, Adam Epstein, had been turning our mountain of footage into a jaunty trailer. Wes Anderson’s music scores are just as iconic and signature as his art direction and I’m amazed at how well Rhys and Adam nailed the tone. They managed to combine the Kinks-dominant British-invasion sound of “Rushmore”, the twee classical notes of “Tenenbaums” and the percussive sound of “Life Aquatic” and “Moonrise Kingdom” — using only library tracks (with the exception of “Me and Julio” by SNL-pal, Paul Simon).
There are two major deadlines for the Film Unit. The Dress Rehearsal starts at 8pm – for which the goal is to have the spot fully mixed and color corrected, but sometimes it’s not quite there yet. Then, of course, the live show starts at 11:30pm, and you’d think that would be a pretty hard and fast deadline…except in this case, when Rhys and Adam were truly down to the wire – scrambling to finish revision notes from the dress rehearsal, minor voiceover changes and final color fixes. Rhys was downstairs in the studio edit bay where the final picture and mix are married together and uploaded to the live switcher. As Rhys was watching down the final cut, he noticed two errors: one shot slipped into the cut without being “un-squeezed” and another repositioned shot had lost its repo. We all know that these kinds of errors happen all the time, but they rarely happen when you are literally gun-t0-the-head, minutes away from a live broadcast.
It’s now well past 11:30pm — but our spot technically wasn’t airing until after the 2nd commercial so we’re basically in penalty time. Rhys is racing to explain to Adam over the phone which shots need to be fixed. Now remember: I hadn’t slept in what feels like days at this point and all I recall is Adam working his stylus at lightning speed, whispering to himself, “It’s gonna be close…it’s gonna be reeeeal close…”. Too close, in fact — as Rhys was then told by the studio that we were out of time; they would have to run the version with the errors. CUT TO: CLOSE UP – Rhys’ face, crushed in defeat. Meanwhile, unbeknownst to Rhys, Adam had just uploaded the fixes to the server, then raced over to the live monitor and just held his breath as our spot went live exactly 20 seconds later.
What none of us knew at the time is that the studio associate director, Matt Yonks, decided to roll the dice and play the fixed spot directly to the air. The spot was literally still loading into the switcher as it was being broadcast out. Holy crap. Thank you, Yonks!
And then, on the 17th floor of 30 Rockefeller Center at about 11:50pm, there was a flurry of high-fives and fist-bumps and woop-woop!’s as our spot – fixes and all – made the air.
And I guess that’s how we did it.